

No turning back: the project gets serious

No turning back......The project gets serious........................................I just said that, bear with caller.
Well the removal of the dashboard proved an enjoyable event.
If swearing, cursing, cramp in arms, cramp in neck, damp, cold, confusion and frustration can be called enjoyable.
Of course I'd read the book many many times on how to do this. In fact I'd read the book so often we needed a new toilet seat. So I was thoroughly prepared if not a little inexperienced.
More good news was that in the evening previous another cardboard box entered the house, it only cost £215 too, a bargain at half the price.
Don't know what to do with the new microwave that was inside though.
Before I embark on this new episode of no turning back let me pontificate on the dearth of cardboard boxes in our modern society. We all know what they are and what they are used for. We have all seen them many times. They are always free when you want one of them.
But let me warn you................Just try asking at a supermarket for one !!
My local 24 hour shop used to have thousands in the doorway at one time. Just take one sir, take thousands, build a new estate in Bulawayo sir, we just don't care, they are there for you because we don't want them.
Same went for the large multi nationals, Sainsbugs, TrespassCo, MoreReasons ect.
These often used but mainly Ingored items were there in their thousands ( hope the grammars good or Dave the teach will frown)
But like some Alien conspiracy now they have all GONE !!
Remember the rules on the wall in Orwells Animal farm, every time the downtrodden referred to the rule it had somehow mysteriously disappearedd.
Well supermarket cardboard boxes are like that.
First they were huge regular sizes and weird shapes that no-one ever took home.
Then they went to rectangular and square that were very handy. We all loved these.
At some point in the dim and distant past they began to get smaller and smaller till now they have disappeared completely.
Apparently they are a fire hazard and must be disposed of Immediately.
Disposed of by squashing flat in a regulation box squasher flatter , then Incinerated.
All by trained and certified supermarket staff courtesy of our wonderful H&S legislation.
I dare you, ask for a box near the large plastic doors next to the Deli counter and you'll get a look like Greek taverna owners reserve for German tourists.
On with the Dashboard.
Left hand upper bracket removed with socket set ( 1/2")
Cardboard glovebox liner removed frontwards by squashing slightly.
I must have spent 40 mins trying the former before latter occurred to me.
Removed both centre air vents easily. Dash showing signs of freedom as left side moves slightly.
Undid steering column bolts easy peasy. Whilst down there, upside down, head in footwell, feet splayed at odd angles out of window and out of sun roof I made a discovery.
previous owners of this vehicle lived like pigs. Nuff said.
I did find the trip re-set though and a "secret" switch which I will investigate sometime.
From this position of recumbent tranquility I also removed Right upper bracket.
Dash loose at both ends slightly but solid in centre.
40 minutes later it occurred to me as to why the centre vents should be removed.
" They hide the last remaining bracket holding the whole thing in position"
But that's when the serious stuff started.
Presented before me was a giant multicolour mess of spaghetti.......God what have I done.
It looks too difficult to but back quickly and run away, and its getting late.
Be brave Potter Pig.....Onwards and upwards.
To be fair the only tricky bits were the vent connections. Small nuts high under the padded top.
All the wires and cables were well colour coded.labelled them though just in case.
I have a feeling this statement will come back and haunt me later on.
Disconnect choke cable - both ends.
Disconnect & label up -:
Interior light
Cigar lighter
Ampmeter
Oil gauge
Fog light switch
Heated rear window switch
Speedo
Rev counter
And then it was lifted clean away...........Thus no turning back.
I'm sure I broke some switches or maybe they fell apart and disintegrated.
However boxed and labeled both ends and feeling rather smug.
Next job. Padded Dash top and heater pipes/vents. Maybe this can wait till after x-mas as yesterday we discussed wallpapering the bathroom this weekend.
Sacrifices. Sacrifices.
Oh yes I almost forgot..........I still need somewhere to store the bloody stuff.
When sparks fly !
This is where our journey begins. Get to know our business and what we do, and how we're committed to quality and great service. Join us as we grow and succeed together. We're glad you're here to be a part of our story.
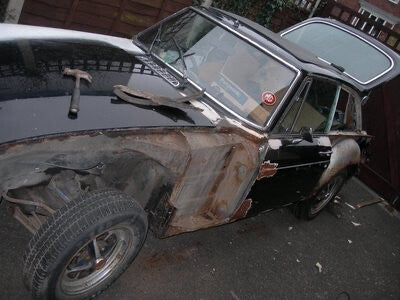
Well what a productive weekend. Well only Saturday actually.
After spending what seemed like ages without so much as lifting the Poly cover something actually happened according to plan...........almost.
Full of the joys of spring and having a Saturday not P***ing it down with rain I set about tackling the wing with gusto. Gusto may not be the right word as I was planning to use my new grinding machine. ( Thanks planning to use my new grinding machine. ( Thanks Ma, great x-mas prezzie)
I was petrified, I had visions of me in Casualty with it wedged in the middle of my forehead, or worse still the whole car going up in a fireball as I determinedly ground down the fuel filler spout.
Logic dictates that the Interior and seats should be removed but I still have no garage
in which to work or store said items, so they stayed put.
Donned in a XL disposable white paper suit I looked the strangest mechanic/repairman ever.
It is only as I write this I realise I was wearing a paper suit and would have made an excellent piece of tinder. As a practice I started on a screw on the lower valance.
He hehee....................................What sparks and noise !!!!!!!!
Positioned awkwardly under passenger footwell with grinder ready. Brrrrrrrrrrrrrrrrrrrr.
Nothing touched. The handle of the grinder fouled on the tie rod of the dash.
Remove handle and start again. He he heeee..........................
Sparks everywhere, heart pounding, mouth dry, very loud grinding noise.
I was actually grinding something.Exactly what I could not be sure but this was a sign that serious stuff was actually going to happen. Hope its to the car and not me.
Fed up upside down, I repositioned to the valance again. Still rather awkward to get behind the
headlight under the wing, so a moment of common sense hit me. Jack the bloody car up full tilt
and access will be better. And so it was, the two frozen nuts mentioned last year disappeared into a mass of sparks and blood red molten metal.
I have a feeling this car is going to be very much like a good woman.
Since I was highly delighted with the removal of two very rusty and awkward nut cages in a very inaccessible place it was then I noticed.........Horror.
I had accidentally ground a disc shaped hole of about 1" long into the front of the radiator support frame. Pants.........just when I thought I thought I was doing well. Still It can easily be repaired, sometime.
Then I realised all the wing bolts were free. I tugged the wing but it seemed still fastened somewhere. Tugged, tugged, no it must be fastened somewhere. I've missed a bolt.
Further check. Much tugging, some pushing then a quick jerk upwards and success.
I'm free....I'm Free.
Well not actually, the wiring was still attached to the headlight. Quick label job then it was well and truly free.
Only prob now is where to put it. Its only rusty on its bottom edge. Its actually wedged under a giant kids slide down the side of the shed at garden bottom.
Inspection of the new area and now exposed sill showed much rust. Only remnants of a sill visible, still the inner wing area is in sound condition.
The valance was unscrewed partially and ground down partially and it came away easily
again with only minimal rust, although it was a bit bent in one area.
I even had time to remove the other wings bonnet bolts and squirt my old friend penetrating fluid on the passenger footwell bolts. It would appear the right side is not as difficult as the left.
Hopefully.
Yet more wet and cold weekends have halted the frenzied pace of restoration.
Last attempts saw the removal of lots. Hope I can remember where it goes back and where I've stored it.
Frenzied is a term I've heard lots of lately.
Wifeys attitude to plotting a new bathroom......Frenzied.
Kids obsession with MSN and chats with mates.........Frenzied
Wifeys cajoling of me to make a start on said bathroom.......Frenzied
My resistance to do anything remotely interesting of a weekend........Frenzied
My boss's attempts at getting the sales team to sell more..................Frenzied.
OK you get the picture, there's some element of frustration embedded in me at not having a garage in which to work or store the items removed so far.
I guess I'm feeling guilty too of not having started on bathroom.
Well I did actually start and that was the prelude to.......well, P***edofness.
Like all males of the species I know best when it comes to DIY.
So tiling the bathroom floor should be easy. After all I'd done the toilet a few months previously ( 800mm x 1.4 meters, with 300mm square tiles)= 15 tiles including 5 cut tiles)that took best part of 2 days due to the awkward shape of the toilet base.
Under the tiles was regular hardboard. nailed every 2 inches ( just to be sure)
So they stuck fine and only one had to be uplifted and re glued.
Shaving an extra half inch of the door bottom made the largest contribution to the buggeration factor. ( undo 9 screws that have not moved for 45 years) move door downstairs, set up workmate ( all day job to remove MG bits from shed so I can see workmate, rest of weekend doing MENSA puzzle on how to extract workmate)
So work started in earnest. Except that I forgot brother in law had the electric tile cutter of mine ( I mean mine in the biblical sense, as it belongs to mate Chris. I borrowed it 5 months ago and he's forgot )
B in L used machine to do his whole bathroom and floor so its had some use and he says in need to cool down every now and then.
Frenzied comes back to haunt me again. That must have been B in L 's
F*****ed attempts at cutting at least 55mm thick cast iron tiles on a hobbyist machine.
The first cut I made the machine lasted exactly 2 inches before it conked ( sorry, overloaded the thermal protection device)
This required a wait of approx 30 minutes, still I could get on with measuring and gluing.
Things got decidedly worse.
After gluing and leaving the floor 80% tiled, the following morning displayed the tiles loose and wobbling like a see-saw.
Crap cement. Heating left on and little feet walking on them did not help.
However, my expert opinion is that I did not listen. I thought I knew best.
I used regular hardboard under the tiles. I needed to use at least 12mm thick chipboard.
So last weekend was spent chiseling off the cement from the tiles, cutting chipboard and laying tiles properly, leaving cutting tiles till the end.
By the way the cutter cuts exactly half an inch now between 2 hours cool down.
Should finish by Christmas then. Unless I ask Chris what's happened to his cutter and he buys a new one for me to borrow.
With luck the weather will improve and the bathroom finished in time for spring.
I hope the solicitor pays out by then, but that stories for next time.
Addendum - This was posted about 20 years ago. Phones did not have the sophisticated cameras as nowadays. And where did they go when you took them, as in storage areas, or what facilities was there to share and access them.
Hence the earlier posts tend not to have too many photos.
This still haunts me now as the old blogger site had a very complicated way of transferring from phone, to Google then to cloud storage or whatever".... ether I think. I have hundreds of photos of my progress on my phone, but getting them to the blog is still a frustrating mystery.
Hope this helps just to keep your interest. New ST spoiler sprayed BL mini green and trial fitted. Not sure about the colour though.
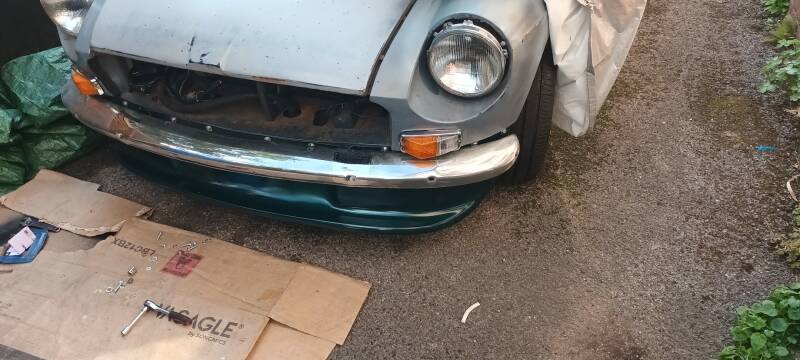
Who turned off the light at the end of the tunnel ?
The title just reflects my frustrated mood of late.
After attempting six time in two days to set up the tile cutter to cut six tiles I finally abandoned the effort to the weekend.
I did feel much better for it though.
The present tile cutter is new and works like a dream. Well it just works like any tile cutter should do. They fit perfectly. Next job is to lift all loose tiles
( approx 50% of them) and stick back down. It looks like I'll have to have a day off work to complete this or do it one evening to stop little feet walking on them till their fully stuck.
How I came to get to this stage is like a de ja vue dream. Similar to the cheap tools I bought earlier on in the year.
The present tile cuter is on its last legs. Its not mine, its my mates which I've had on permanent loan for about seven months. Brother in Law borrowed it for his tiled floor and I'm afraid it just wore out. perhaps the 15mm thick tiles he was cutting had something to do with it ?
Anyway,I decided to buy another one. Did the usual trawl of B&Q, Do-it all, Wickes etc. Decided on a "cheaper" model from B&Q: £ 29.99 and made of "stainless steel with 150mm cutting disc"
Gawd ......what a mistake.
When assembling on kitchen worktop ( yes it was raining outside) the "stainless steel" tops rectangular hole where the blade pokes through was mis-aligned.
Mis-aligned is a kind phrase. The only way the blade didn't touch the "stainless steel" top was when it was tilted at 45 degrees using the unique selling feature of " even cuts tiles on the angle". It a moment of testing I accidentally started the motor, only to see sparks fly, Howling graunching noise and a team of people rush into kitchen to expecting to see six tons of girders there with me underneath.
Crap............
I got out the trusty angle grinder to try and modify/remove the offending mis-placed hole. Reassembled and.........Crap.
Took the thing back to B&Q and got a full refund. I don't know where it was made but i suspect made in C**** was somewhere cunningly hidden.
Exactly one week later I visited B&Q and there I spied a Plas****s tile cutter for the same price. Admittedly a little smaller. I bought it and its wonderful. It did the job, easily with no fuss. I got frostbite from cutting tiles outside in the howling wind with wet hands, but hey.......the job done, almost.
My next rant is how ironic life is.
A while ago i posted on the internet somewhere, may have been this blog, the probs with the spinning captive nuts inside the wings where they were inaccessible.
I received last week a very kind and lengthy reply on how to resolve this issue.
In fact i had already resolved it, but nevertheless, the tips were excellent but not applicable in my case as the cages were inaccessible.
I still have faith in good ole E-bay. I was watching a bodyshell hoping it might go cheap. Did not win but decided to contact the winner.
A fellow MG restorer and by the sounds of it a willing and understanding bloke.
The shell is about to go to the scrapper as he has all the parts he needs from it.
Bless him, he offered to cut off the parts i need ( LH rear top wing, gutter section ect) I,m sure he will come through. Especially if he reads these pages.
I'm going for the sympathy vote.
All I've done MG wise is re-tie the poly sheet countless times after wifey bought some clothes line especially for me. To replace the 60 meters of telephone cable the Sky installer insisted on leaving I've been using.
The Easter weekend signals some positive action though...if....big if... the weathers good I'll tidy shed, dispose of lots of crap and organise the removed items from the MG.......hopefully, and after the tiling is complete.
Addendum. Another random photo to keep you captivated.
Information
We pride ourselves on our adaptability and commitment to excellence in every aspect of our service. Explore what we have to offer and how we can contribute to your success.
Information
We pride ourselves on our adaptability and commitment to excellence in every aspect of our service. Explore what we have to offer and how we can contribute to your success.
Information
Create Your Own Website With Webador